|
l Main l FAQ's l Installation l OnStat Links l Shop OnStat l Software: Updates & Demo l
(708) 885-9779
|

|
|
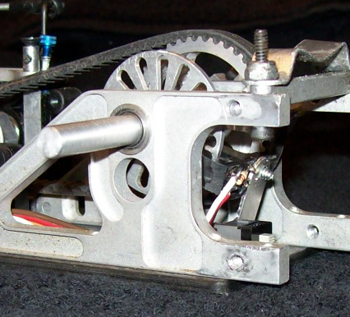
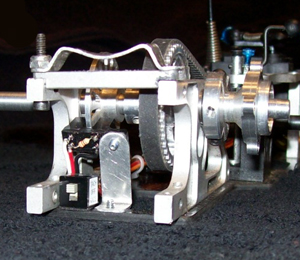
Before Ordering determine which size diameter trigger disk is needed for your car. Select 1.0" or 1.25" diameter so that the sensor can read the wholes in the trigger disk. Trigger disk size is based on the constraints of your rear pod uprights. Generally the 1.0" trigger disk is used on electric cars and nitro cars. Step 1: Install trigger disk on axle between rear pod uprights. Picture at left displays a 1.25" trigger disk and sensor mounted to lower chassis plate with supplied bracket. The trigger disk is mounted to the rear axle with 4-40 set screw in similar manner of a rear wheel hub or belt pulley. Step 2: The infrared sensor and bracket are mounted to your chassis by using the supplied bracket. The sensor with bracket is mounted to the car chassis in a manner so that the U-shaped sensor will straddle each side of the trigger disk. Determine where on the car chassis the computer will be mounted, the location determines the sensor with cable length (part # oc-sc05, oc-sc15 or oc-sc25) needed for your setup. If computer is to be mounted at rear of car then a 5" sensor wire assembly (part # oc-sc05) can be utilized. When mounting the computer near front of car chassis a 15" or 25" sensor wire assembly can be utilized. |
|
|
|
|
|
|
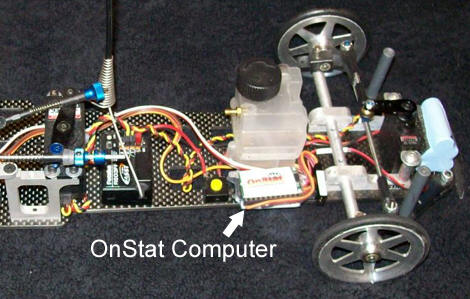
Step 3: Mount computer on chassis of car or rear pod area. Insure that computer is mounted in a safe secure place on your car. Most racers position computer near rear pod area. Computer may be ordered with longer sensor wire enabling mounting of computer near front of car. Some nitro cars utilize a mid or front chassis mounting location. Most cars can accommodate the computer in the rear pod area or mid to front chassis area. |
Step 4: Solder the OnStat power wires to your servo buddy pack. Red wire to positive and black wire to negative. Check your connections and place switch in RACE mode the led flashes red for approx. 1/2 second, pauses for approx. 1/2 second, and flashes green quickly. This indicates the computer is ready to record a run. (note: led sequence may be different based upon onboard computer firmware) Step 5: Remove pinion gear or drive belt from your car so that rear axle can be spun by hand. Turn computer to Race mode and wait for led to flash red once then flash green quickly. Spin wheels by hand, computer will record movement. When recording stops led will flash red every 5 seconds. |
|
|
Note: The OnStat Onboard Computer has an added feature that allows the user to connect the car to the laptop and view a real time tachometer display. This can be used for such things as warm-ups and motor break-ins. Place the switch in TACH mode, connect the download cable to the OnStat Computer and your laptop. Click on RPM Readout and a real time rpm display is provided. (This feature is not available on some Onboard systems based on firmware) |
Step 6: Attach download cable to the com port on your laptop or desktop with OnStat software installed. Click on the download button and the led will flash green once and download will begin, when downloading is completed led will flash red for 5 seconds, afterwards the results will be graphed on your computer screen. After downloading the computer will enter re-download and hold the run until the computer is turned off. | |
|
- Trackside Dyno - Onboard Data - |
||